")
Planks Aren't Enough
Your Low back pain needs wrap-around strength
Does your back ache after doing work around the house? Do you avoid cleaning the tub or folding laundry because you know it’ll make you sore? Do you feel weak or frequently hurt your low back when strength training?
You’ve likely heard “getting stronger abs” is the solution, but you’ve built to a world-record plank hold and your back still gets sore.
While it’s true building ab strength is part of the solution, we need to think about it at a higher level: overall spinal stability and one common fault is for the low back to cave in, a position known as lumbar hyperextension. Let’s start by defining the issue, and then we’ll consider how to address it with strength.
Desk Jockeys: This one's for you
Low back pain isn’t limited to the aged, or to those who do a lot of strength training. In fact, many people face an ever-increasing number of health issues resulting from an occupational hazard: spending far too much time stressed and hunched over staring at a computer screen. When we spend hours sitting, slouched and stressed – both at work and in our free time – we suffer long term effects that immobilize and weaken our bodies.
I experienced low back pain for years. I had a feeling that “getting stronger” might help, but I had little direction or focus until I started to understand the benefits of training. The more I learned about resistance training the more I understood I had some fundamental problems. It wasn’t just that I was deadlifting wrong; I was also standing wrong, sitting wrong, and walking wrong. And a lot of my issues came down to lumbar hyperextension.

What is Lumbar hyperextension?
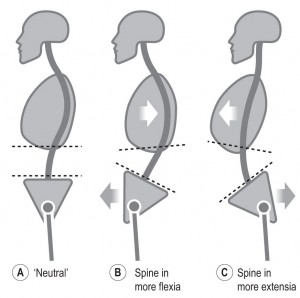
We should probably start by defining this idea, lumbar hyperextension. In short, it refers to the excess concaving of the low back, as shown in image “C.” Lumbar hyperextension can be observed in many positions. One way you can recognize lumbar hyperextension is to take a photo of yourself. Can you see your back arch? Do your ribs angle up as your pelvis drops down in front? These are clear signs of an issue.
Now we that we can recognize lumbar hyperextension, what can we do about it?
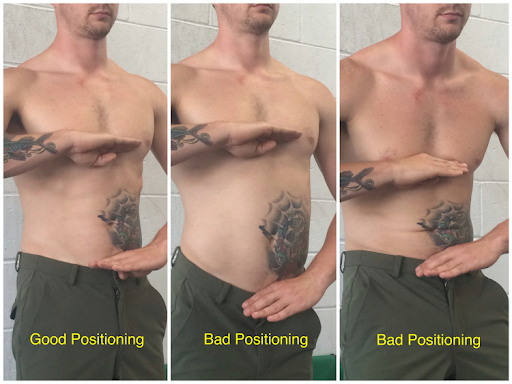
The two-hand rule is an easy method to recognize good spinal alignment. Place the thumb of one hand at the bottom of the sternum and the other hand at the top of the pelvis. Ideally, the hands should be parallel. It’s easiest to check your position while standing, but the rule applies to nearly every position and movement. Remember that the rib cage and pelvis are aligned when our spine is neutral, but the rib cage and pelvis can be difficult to see. So, by placing our hands at the bottom of the rib cage and top of the pelvis we can spot misalignment easier. This ideal alignment applies to sweeping and squatting, cleaning the kitchen counter and deadlifting.
Using a picture and the two-hand rule are reliant on visible signs, or external cues. But when you’re at the gym or doing the dishes, these visible signs may not be available, so let’s look at a way of learning to feel a neutral spine.
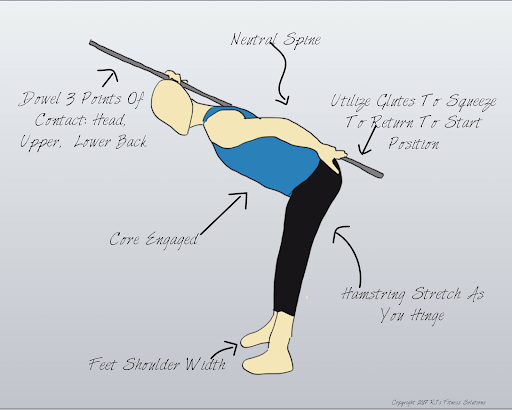
Place a dowel or PVC pipe along your spine. The PVC should be long enough to extend above your head and below your hips. You should feel 3 points of contact: the back of the head, the upper back between the shoulders, and the tailbone. Once you’ve found those 3 points of contact, hinge forward by bending at the hips with a small amount of bend in your knees. In order for this to work, it’s essential that you maintain all three points of contact while you hinge. If you can’t, reset and try again, more slowly, and not going as far down.
Our clients have found success in avoiding lumbar hyperextension by building awareness of what ab engagement feels like. Internal cues, where we focus on feelings or sensations, have a number of advantages to external cueing. When you find that feeling, you have a reliable sign that can be translated to a wide array of movements. Building internal awareness, rather than using a description of what it looks like to an observer, makes it possible for find that feeling in any position without trying to imagine what it looks like on the outside.
Let’s work to build awareness and strength to increase lumbar stability. And yes, this is where we revisit your abs.
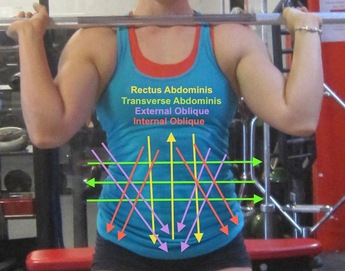
Your abdominal muscles stabilize your spine, but it’s not only the six-pack we often think of when we hear “abs.” The abdominals are made up of 4 muscle groups, listed from the most superficial (closest to the surface) to the deepest:
- The rectus abdominis or RA (the “six-pack”)
- The external obliques or EO which run from your mid-back forward and down to your pubic bone
- The internal obliques or IO which run from the bottom of your ribcage down and back to the rear of your pelvis
- The transverse abdominis or TA which runs horizontally around your waist
The RA (the “six-pack”) cannot stabilize your spine on its own. In fact, too much emphasis on the RA and you’ll probably pull yourself too far forward and put excess load on your low back. While the EOs can create rotation, more importantly, they can also provide a bulletproof structure for the torso. But learning to engage the EOs isn’t always easy.
Start by relearning how to breathe
Let’s start with some external cuing: place a ball or kettlebell (15-30 pounds is good) on your belly, between the belly button and pelvic bone. Put your hands on the top of the ball to keep it in place while you breathe. Start with a full exhale, allowing the ball to fall into your stomach; the key is to relax as much as possible. On the inhale, push the ball up by sending your breath low into your abdomen. While doing this breathwork, the ball should visibly sink with each exhale and rise with each inhale.
Want to read more about the impact of quality breathing? Read this post on incontinence by WFA coach Chelsey.
Now let's feel the external obliques as they engage
After some breath work, it’s time to learn to build tension in the external obliques. With the ball where it’s been, start with a ¾ inhale, which you’ll then hold, and engage the abdominal muscles which hold the ball up and make the waist wider. Test your engagement: find your hip bone with your fingers, and then move your hand just above your hip bones; do you feel taught muscles under your fingers? You should – those are the external obliques.
Once you can find the external obliques, hold this engagement for longer and longer, up to a minute for 3 sets. This is a great warm-up before a strength training session, to be sure the EOs are online and ready to support the spine. Building awareness of the feeling of EO engagement makes it easier to find it and maintain it when performing another movement.
Breathing? Check. External oblique engagement? Check.
Let’s put it all together make it harder.
Maybe the best exercise for building awareness into the obliques (and remember, with awareness comes strength), are offset rack carries. Once you realize that carries like this are a core exercise, you’ll be transformed.
The offset rack carry is a one-sided carry with a single dumbbell or kettlebell. The weight is held in the rack position on one side while you walk some distance. 30-60 feet is a good starting place. Once you finish on one side, switch to the other side. Repeat 3-5 times, making sure to include both sides each round. The rack position refers to holding the bell in front of and just below the shoulder with a bent arm. Your elbow should be close to your torso, and your shoulder and chest need to be actively involved in supporting the load.
You might wonder why we’re doing one side, instead of both? When we load unilaterally we can build anti-rotational strength, an essential function of the external obliques. Loading a single side forces our obliques to do the hard work of keeping our spine neutral and not leaning to the side. Another benefit of offset is that you have a hand free to check your external obliques and make sure they stay engaged during the carry.
One last piece of advice, remember to breathe while you carry. Proper breathing on its own helps fight lumbar hyperextension but it’s even better to learn to breathe under load with complete abdominal engagement. Be sure to keep the breaths smooth and consistent.
Go forth and breathe, engage your abs, and practice your carries.
Adding breathing and external oblique engagement into your warm-ups, and loaded carries into your workouts, will build you a stronger torso and a spine less likely to get injured.
About The Author
MICHAEL IS THE HEAD COACH AT WASATCH FITNESS ACADEMY.
HE TEACHES YOGA. AND RUNNING. AND STRENGTH & CONDITIONING. AND MENTORS COACHES. AND RUNS THE SHOW.
MORE NOTABLY, HE’S ON HIS OWN FITNESS JOURNEY TOWARDS A LIFETIME OF HEALTH SO HE CAN SKI FOR ANOTHER 60 YEARS. AND HIS LIFE’S WORK (FOR THE MOMENT) IS TO BUILD THE ULTIMATE PLACE FOR INDIVIDUALS OF ALL STRIPES TO GET HEALTHIER AND FITTER, THROUGH PROGRAMS THAT ADDRESS THE WHOLE PERSON.